Ford Focus RS Forum banner

Rear Tow Hook provision anyone?

1 reading
29K views 36 replies 17 participants last post by  fbaltona  
#1 ·
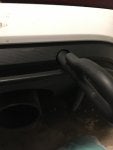
To all you lucky RS owners that have already taken possession of your RS's: has anyone seen if there is a provision for a rear tow hook / ring, similar to the one in the front?

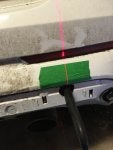
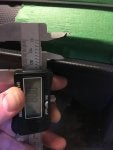
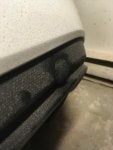
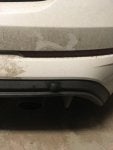
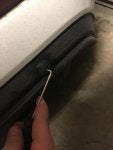
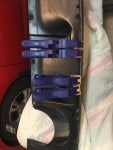
I have not seen any pics of a removable plug on the rear bumper fascia, and I have not seen an RS up close enough to look underneath and check out the rear crash bar to see if there is a threaded insert along the attachment to the frame rail . . . anyone with a car willing to check for the forum?

One in front should be enough for the track, but it's always nice to have one in the rear, for those especially interesting offs.
 
#2 · (Edited)
Well, a year after first posting, and 7 months with the car, and I finally got around to doing it.

Thanks to @Sleeper for noticing the threaded provision at the rear of the right frame rail.

I basically popped off the black diffuser, slipped my hand between the white (covered) bumper fascia, found the location of the threaded provision, then dremeled out a hole big enough to fit the OEM tow hook. Then replaced diffuser panel, made an educated guess on where to start, then Dremeled a hole and expanded it slowly until the collar of the OEM two hook cleared the diffuser panel easily. The hole in the white bumper fascia is way bigger than it needs to be. The hold in the black diffuser panel is very close to exactly the size of the lower collar on the OEM tow hook. The final hole in the black diffuser panel is 1in. diameter.

The threaded provision is left-handed, just like the front, so the same OEM tow hook can be used at both sites. I bought a second OEM tow hook, so the car gets both front and rear hooks when at the track.

Because the necessary hole traverses a complex surface on the black diffuser, I don't have a plastic plug that I can snap on and cover the entire hole. So I used a #6 rubber stopper (from beakers and graduated cylinder use in HS chemistry labs). It actually fits well: it is long enough that it totally plugs the entire hole along all the complex surfaces.

However, if anyone can think of a better, less hoopty way to dress this access hole, I am all ears.

 
#5 ·
Well, a year after first posting, and 7 months with the car, and I finally got around to doing it.

Thanks to @Sleeper for noticing the threaded provision at the rear of the right frame rail.

I basically popped off the black diffuser, slipped my hand between the white (covered) bumper fascia, found the location of the threaded provision, then dremeled out a hole big enough to fit the OEM tow hook. Then replaced diffuser panel, made an educated guess on where to start, then Dremeled a hole and expanded it slowly until the collar of the OEM two hook cleared the diffuser panel easily. The hole in the white bumper fascia is way bigger than it needs to be. The hold in the black diffuser panel is very close to exactly the size of the lower collar on the OEM tow hook. The final hole in the black diffuser panel is 1in. diameter.

The threaded provision is left-handed, just like the front, so the same OEM tow hook can be used at both sites. I bought a second OEM tow hook, so the car gets both front and rear hooks when at the track.

Because the necessary hole traverses a complex surface on the black diffuser, I don't have a plastic plug that I can snap on and cover the entire hole. So I used a #6 rubber stopper (from beakers and graduated cylinder use in HS chemistry labs). It actually fits well: it is long enough that it totally plugs the entire hole along all the complex surfaces.

However, if anyone can think of a better, less hoopty way to dress this access hole, I am all ears.

View attachment 203146 View attachment 203154 View attachment 203162 View attachment 203170 View attachment 203178 View attachment 203186 View attachment 203194
Oh dude that's rad! Exactly what I had in mind. This project got put on the back burner with all the other crap I've been doing. Nice work! Now come do mine...
 
#4 ·
@Aracheon how about a nice little threaded plug, knurled cap or thumb screw style?
 
#8 ·
There are images if you search Ford Racing Tow Strap. Some guy has them all over instagram and manufactures them in small batches.

I wish I knew what the spec was for the left hand thread in the tow hooks. English, Metric? Thread size? Rather than buy the license plate kit to throw away most of it.
 
#12 ·
I was baffled this past week when there was no provision back there. Glad to know that it exists, but is just covered up. I may have to break out the dremel this weekend!

Anyone happen to have the part # of the OEM tow hook so that I can pick up another for the rear? Or, is it cheaper to just get an aftermarket one?
 
#15 · (Edited)
I did mine friday while swapping in a euro rear diffuser. I had this little mod planned since the day I first saw this thread thanks everyone for sharing the info!

That little rubber plug you guys used was not available anywhere around where I live so I finally found some round vinyl chair legs protectors that were the correct outside diameter, removed the shine off it by sanding it and drilled a tiny hole to be able to pull it off with a pick (pick now added to the tools I carry under the trunk mat)! Looks just fine just need to sand it with a finer grain to remove the marks I made on it with the rougher grain.

I broke most of the stock diffuser tabs while removing it, couldnt find another way of removing it other than pulling it out without taking the bumper off completely, most of the tabs are hidden behind the rear crash/bumper bar. The tabs are fragile and held on pretty tight by the mating clips. Took some measurements to help anyone planning to do this without taking the diffuser off to first locate the hole and drill it out with a holesaw. It can always be enlarged as required using a pencil grinder which I had to do a bit of after using the holesaw, also allowed cleaning the plastic burrs. It’s pretty close to the threaded hole center, maybe a few thousands off center but the hook base still fits fine for installation.

Hole location (for reference only use at your own risk I guess...):
- 3.85in from the inboard extremity of the reflector lense;
- .875in up from the diffuser “horizontal” lip surface;
- Drill gradually up to 1/4” than verify you are lined up with the threaded hole using a rod + light source (holesaw pilot is 1/4” anyways so this will actually help guiding the holesaw afterwards);
- Use a 1in diameter holesaw to open the hole to final size, enlarge as required using a pencil grinder or other preferred tool and remove burrs.

Overall I’m very pleased with this little mod and will be used when ice racing next winter and during track days this summer. Thinking of spraying the hooks in red to finish it up. Sure hope never to use the hook but at least now it would possible to do so!
 

Attachments

#20 ·
@320icar that’s exactly what happened to me! Figured I would never get the diffuser off any other way so I had to break most of the clips...but I had a replacement so I did not care as much.

How well did it go back in with the broken tabs? Curious if ever put the stock diffuser on if/when I sell that car.
@nicklulu any 1in hole saw (see picture attached) should do, my guess is don’t use one that too cheap/not so sharp, mine was labeled for wood only and left a rougher edge than some better tool might have done like a carbide tip one maybe.

If someone wants to share some measurements to correlate mine you could easily do it without removing the diffuser.
 

Attachments

#21 ·
It actually still clips in just fine even with the broken tabs. Since it also is held in with push pins underneath it shouldn’t go anywhere. During ice racing it started coming off, but I was doing donuts in snow for 2 days straight so I didn’t expect anything else. Slush and ice got behind it (just like rocks in the summer) and had to wait til it thawed a few days later to push it back in


Generated from my Apple iPhone using tools.sportscard.trade
 
#22 ·
Yeah I figured the corners would pull out first, the diffuser seems to naturally want to bend out of the corners already. Good to know it still holds under normal driving conditions.

The euro diffuser I bought used also had the tabs broken. I fixed them by bonding small .016” thick aluminum doublers behind each tab. I was trying to avoid doing this to the stock diffuser if I ever put it back but it works if you want to fix it as some point, especially the first two clips at each bottom corners which might be the most important clips of all 18 clips. It just takes some time!!

Used epoxy adhesive and clamps to bond them in place. I lost one at installation but I think all other doublers held fine. That one I lost was actually one where the adhesive did not cure properly (wrong mixing or not waited enough for the adhesive to “gel” before clamping the doubler in place).
 

Attachments

#23 ·
Sprayed the hooks in fire red this week. Just added P-Touch labels today now that the paint has dried so the one hook with the smaller flange diameter is easier to identify. It’s the only one of both the hooks I got that fits through the 1in hole in the rear diffuser. Dont remember if it’s my stock hook or the second one I bought on eBay though!

Paint is a bit cracked...was being impatient and sprayed clear over paint that was not fully dried the other day. Had to sand it off (as much as I had the patience to do so) and start over. It still shows a bit since I did not sand it all down.

They will be mounted only a few times a year and still look good. Can only be noticed when looking from a very close distance. Still happy with the overall result. Be patient and let the paint dry!!!
 

Attachments

#30 ·
Okay so the best way I can describe it is the plastic diffuser is held on by about 4 screws underneath/behind which includes a thin metal heat shield. Once those are popped off, there are probably a dozen tabs that lock the perimeter of the diffuser in place.

now, the tabs are an odd setup. The ‘male’ end of the tab is built in to the bumper, and the ‘female’ side is on the diffuser, but at the same time these tabs are also male (yes I know that sounds stupid). They are these very thin walled plastic bits that if you ‘pull’ them out like a norma tab, they just rip open. Hard to tell but you can sort of see what I mean on the schematic below (number 10). I have no idea how people remove theirs without breaking every single one of them. You’d have to take off the bumper and do it from behind

340999
 
#32 ·
First euro diffuser I bought had most of the tabs broken. I made thin aluminum doublers for each broken tab and bonded them using epoxy adhesive and clamps. Took a lot of time and patience but worked fine.

When I pulled my stock piece I also broke most of the tabs.

Backed in my motorcycle one day and broke the euro diffuser so I had to buy a second one! Bought new this time.

You dont absolutely need to pull the diffuser off to drill the tow hook hole. I think I posted some dimensions (and others might have done that too) that should allow you to drill a smaller hole to begin with, validate proper alignment and then enlarge in line with threaded insert in crash beam.

I believe the stock rear diffuser is pretty cheap too if somehow you mess it up!

Had to the use the rear hook when I crashed at ice racing this winter, I was glad I did this small and cheap mod!
 

Attachments

#34 · (Edited)
I'm wondering if you could do something similar so that the black part only has a thin slot with the strap showing through? Then no need for a plug. Could you possibly use a bolt from a licence plate mounting kit?
How in the world did you find horizontal lip surface?

Hey, you'd know this...how far can the RS be towed without causing damage to the RDU? I'm guessing you just put it in neutral and keep the speeds low? If you went off in a bad spot and weren't able to restart her, my local track could leave you with more than a mile of towing.
 
#35 ·
I'm wondering if you could do something similar so that the black part only has a thin slot with the strap showing through? Then no need for a plug.
That would look good until you actually use it to tow. Since the strap is flexible, it would put pressure on the plastic bumper if it was towed at any angle other than perfectly straight.