Ford Focus RS Forum banner

Focus RSE - SE or ST to RS swap with AWD

2 reading
66K views 114 replies 30 participants last post by  crashcourse460  
#1 · (Edited)
Having done this kind if thing with various Impreza to STI models over the years, I thought I'd try it out with the Focus. I've seen lots of speculation on the plausibly and difficulty, so it's time to find out for sure.

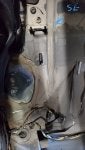
Donor car, 2017 RS, appears to have taken out a moose or some other large hairy object, roof mostly sheared off.

Swap car, 2013 Focus SE. Basic, manual, with a sunroof.

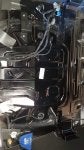
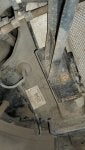
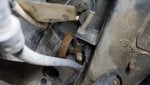
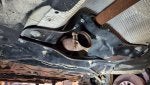
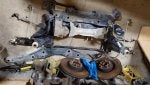
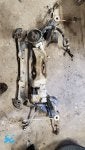
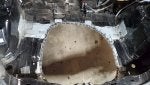
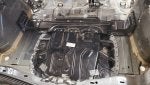
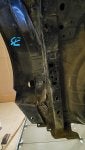
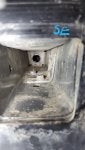
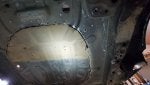
I'll be changing out everything to the bare shell, and moving over the RS strengthening plates, missing captive nuts, and other little details.

I know it can be done, but let's see just how hard it is to do.
 

Attachments

#3 ·
Manitoba, snow and cold.

AWD too, plus all wiring.

And this is the part that makes me most hopeful about the ease of installation. Obviously the rear floorpan is different, but it seems they simply cut out the spare tire well and attached a flat panel over it rather than making a whole new panel, which means the rest of it should be the same.
 

Attachments

#4 ·
This is an awesome project and I cant wait to see how it all turns out! To be honest i'm jealous and am now wondering how I can slip a project like this past my wife...

Please keep up us updated with photos and any problems you come across, as there are a lot of wrecked RS out there that could be saved. Good luck.
 
#5 ·
I really hope the OP will try to keep as much of the standard SE body panels as possible to retain the look and keep the "sleeper" theme.

Considering a few blokes/Olegs across the pond were able to do the same on a standard Focus estate/wagon, should be very doable. Might even be easier since the wheels base is more similar?

 
#26 ·
I really hope the OP will try to keep as much of the standard SE body panels as possible to retain the look and keep the "sleeper" theme.

Considering a few blokes/Olegs across the pond were able to do the same on a standard Focus estate/wagon, should be very doable. Might even be easier since the wheels base is more similar?

I think a sleeper would be great, but it wouldn’t have enough grill space for intercooler and radiator and brake ducts etc.

Personally I like the ST fascia better than the RS so I considered doing that swap for a while, but then I came up with a much easier option of whiting out the crash bar.

Anyway keep up the good work!
 
#6 ·
Although I appreciate the sleeper look, I'm not down with the base Focus style (never even noticed them till the RS came out) so it will look pretty much like a standard RS. I will be doing something different with the side skirts, a kind of hybrid between them, and using Evo X Recaro seats. I have never felt comfortable in the Focus Recaros, and I don't like power seats.

Next step is going around the shells and trying to see what does and doesn't match up. For example, the swaybars are in completely different places, but it seems they just reused the base exhaust hanger mounts.

Most important is the subframe mounts, which all appear to be in the same position - and the frames even seem to even be created off the same base, as the RS has these unused brackets which hold the swaybar on other models.

Trailing arms also share the same space.

Before buying the swap shell, I took a lot of time examining the floorpan of the FWD models, especially the tunnel and spots where the driveshaft would mount. And again, just like with the rear swaybar brace, they seem to have reused other existing holes to secure the driveshaft. The rearward bearing mount is just a chassis stiffener on the SE, and an exhaust hanger on the ST.
 

Attachments

#7 ·
Man! I would never in a million years have the rocks to try this. But six posts in and it's already the most educational info I've seen regarding model differences/similarities. You're doing the lord's work, my friend. Keep it up! Looking forward to all your discoveries!
 
  • Like
Reactions: BerylGalaxy
#8 ·
I'll definitely admit it took me a while to try it. I bought the RS with this in mind, but after looking over the damage it would have only been a couple hundred dollars more expensive to fix it rather than swap it... but curiosity got the better of me.

Stripping the RS, I just keep finding glass everywhere. I've done 3 separate vacuuming jobs at this point. Windshields are bombs.

Also, I have some serious grievances with Ford. How many different types and sizes of fasteners do they need?? Working on Japanese cars all my life, I need a 10,12,14,17mm socket, and a single phillips screwdriver for 90% of the car. On this thing, I have out like half the toolbox. There is no need for both a 10mm and an 11mm bolt - just pick one! Not to mention 5 different sizes of torx bits. I do like the v-band clamp for the exhaust though.

It seems I have the common transfer case leak. Will address that when the engine comes out.
 

Attachments

#10 · (Edited)
Also, I have some serious grievances with Ford. How many different types and sizes of fasteners do they need?? Working on Japanese cars all my life, I need a 10,12,14,17mm socket, and a single phillips screwdriver for 90% of the car. On this thing, I have out like half the toolbox. There is no need for both a 10mm and an 11mm bolt - just pick one! Not to mention 5 different sizes of torx bits. I do like the v-band clamp for the exhaust though.
^Very much this! Similar situation, been working on almost exclusively JDM cars before the RS. I feel like I'm going out to buy a new tool every time I work on this damn car!
 
#12 ·
The oem "skid plate" was already looking like chanticleer hegemony so I'll either a DMG fab one, or make one.

If I had picked a sedan, I probably would have stayed with an Evo. But I'm sure what is learned from this experience could extrapolate to the sedan.

These front ball joint bolts look very rust worn for a car with 20k on it. Going to be unloading the anti seize on this.

And the RS front subframe is out. Gotta say, that was not that hard to do. Love working with electric power steering. Rear frame is out as well. Time to move on to the SE.

One thing I can say for Ford, you don't get this cute stylized bracket on a Subaru 😅
 

Attachments

#13 ·
The first unexpected body differences have appeared. However I can't actually be sure if this is a RS vs base Focus thing, or part of the facelift update because they don't seem to serve any sort of strengthening improvement. In fact, I'd say the depressed section on the SE floor is a stronger design.

The change in the quarter panel which is definitely from the facelift redesign is highly unnecessary. Why not just make the bumper bracket larger? Seems way more expensive to redesign the press die for the quarter skin.

I do like this modular front end. Should be quite easy to pull the engine out.
 

Attachments

#14 ·
Front subframes are out from both cars now, and all the mounting points look the same. As suspected, but feels good to confirm. It looks like the RS front subframe has spacers on the mounts to lower the frame a few centimeters, driveshaft clearance or center of gravity shift most likely.

Here is the underside view of the RS trunk floor, clearly just a tacked on panel over the cut out spare tire well.

Looking at the rest of both rear undersides I don't see any significant differences in the frame rails or important bracing. Only the addition or subtraction of small brackets.
 

Attachments

#15 ·
Getting harder to tell these two apart the more that's removed. Once they're both down to nothing the transfer can begin.

So the drift stick is cool, sure, but how can it compare to the giant swan handbrake?? I was not expecting to find this when removing the center console. I may try to use this on the RS as it will definitely give better leverage.

Another challenge will be swapping over the gauge pack and keyless start button as the SE doesn't have the holes for them. The RS dash is badly scratched up from glass so I don't want to use that. I also found two different ways to remove the dash - just the big plastic cover, or together with the rebar and HVAC all as one. Doing it all as one unit is certainly easier (only a few quick connect wires and 8 bolts) but you really need a friend to carry it out. Seriously heavy.
 

Attachments

#18 ·
I'm glad everyone is enjoying this, it occurs to me a few times a day how much easier it would have been to just fix the original shell. But then we wouldn't learn anything! Also, a good opportunity to do sealing, rustproofing, and anti-seize. And funny you mention that, we build an STI widebody wagon which was named Frankenstein.

While the dash was out, I debated disassembling the HVAC to clear out any broken glass that may have fallen inside. When I pulled out the plug at the bottom, all debate was ended. I've had cars in the past where the selector doors became stuck on far less debris.

Overall a very simple box. But...
So
Much
Glass.
I couldn't believe the amount that poured out of there, and this on top of everything that came out of the dash. Definitely glad I took the time to clean it out.

Anyone need any SE parts? I've got a pile growing out back that will need attention eventually.
 

Attachments

#19 ·
Getting into the good stuff now, trunk floor bracing. As previously shown, it appears the various changes in here are just attached to the base Focus floor. Time to take them off and test that theory.

First to go are the much discussed Lions foot - feet? Anyway.. turns out they are only held in with some kind of adhesive expanded foam and one bolt. Seeing the big nubs I first thought it was large rivets, they're certainly hard enough to be mistaken as such. Heat gun and a pry bar got them off pretty easily. One side more than the other.

Also, made by Lincoln? I wonder if it's used on another Lincoln product and adapted for the RS? No individual part number to check.

The floor cross brace was a much harder part to remove. Made of fairly thick steel, and spot welded in. Using this Blair spotweld cutter made it much easier. And was very neccessary for the next step.

The spare tire replacement floor is held in with no less than 50 spot welds. This took quite a while, and is also made of thicker steel than typical body panels.


And the moment of truth? They fit! Still going to be a while before I can permanently attach them though.
 

Attachments

#22 ·
The Focus community, and myself. When I had the '18 RS everything was an unfamiliar mystery to me.

Engine and transmission are out now, put aside for later. Still need to deal with the leaking transfer case. All the seals cost about $150.

So another thing that made this project a reasonable gamble, was this picture from the Ford sales training manual. It shows all the body shell modifications from the base Focus. Seeing how they took note to even mention a removed stud (like really, who cares lol) I felt confident there were no other significant changes.

Now we already know about the floor bracing, and have seen the floor itself doesn't differ much, aside from losing the strengthening ribs which may just be a year difference (2013 to 2017), the one unknown to me was the "structural foam". From the picture it's hard to tell exactly what, or even where it is. So I pulled out an inspection camera and looked into all the rear frame rails crossmembers.

The rails forward of the rear subframe mount are the same inside and out. So that's good. But there is a couple differences in the rail right where the subframe mounts (above the coil spring) both inside and out. Firstly, the SE rail has more holes in it, no apparent purpose for them. Secondary, and unexpectedly the SE has more spot welds on either side of the rail. The RS has most of the same holes, but some are blocked off by a second layer above.

When viewed from the end, there is not much to see, except that the SE central brace has an open hole, and the RS has a closed one. Being that this is the only point in the rail that had some abnormality, it's time to get real exploitative.
 

Attachments

#23 ·
Decided to make this two posts as I'm not sure if there is an image limit.

Knowing there was something going on in this boxed section, I pulled out the angle grinder and made a window on the RS.

This showed that the box's large hole was blocked by some plastic. Very odd. Surely this couldn't be the so called structural foam? So I cut more.

The boxed section has this piece of honeycomb plastic inside. Still not foam.... but then I looked closer and noticed this blue goo. Closer inspection revealed it to be of similar construction to the expanded foam used on the lion's foot.

It glues down the plastic box in this section of the rail - but only the bottom. It took a while for me to understand how this offers any sort of improvement, but I eventually came to the conclusion it is for lateral movement in the rail when combined with the different boxed section.

Why this boxed section was changed, I can't say. The SE box has more bracing in every direction but laterally. I made a sketch of the two variants to visualize this.

Now, is this little cube neccessary? Does it actually have any significant effect? I somewhat doubt it. Nevertheless, I will be adding something which should offer the same effect (or even more) to the SE.
 

Attachments

#25 ·
As a follow up to yesterday's posts about the reported changes by Ford, I actually found the shortened stud in the engine bay. Looks to be simply cut off. Fortunately for whatever reason, the SE didn't even have a stud there at all.

Since the rear rails and floor have been figured out, I wanted to double check the fuel tank strapping. Using a homemade point to point measuring device, I can confirm all 4 fuel tank strap holes are in the same position. However the LH rear one has no threads, just a hole, and the LH front one has threads but they are unused and rusty so they needed to be tapped.

Tomorrow we get to cutting out the spare tire well. From everything I see, there will be no way to keep it without relocating both the differential ecu and the carbon canister, and even then it would be tight.
 

Attachments

#30 ·
Of all those bumper variants, the RS one is the only one I like. Something about the grill shape, kind of reminds me of the Evo X. I'm sure anyone who wants to go with the sleeper look could make the base or ST bumper fit.

Today, we cut a great big hole in the floor! Once the spare well was removed, the flat floor fit even smoother. Also, side note, the flat floor weights almost double that of the spare tire well. Much thicker material. I used the floor brace to help align it. I found this part number on the brace, and tried to look it up, but there is no such listing. This brought me to a decision.

If the RS specific floor parts can't be purchased alone, and only as an assembly for around $2800, I made the decision to make them removable. Plug weld filling the drilled spot welds makes it extremely hard to ever remove them again, so I needed to find a solution that was removable, but as strong as welding. Enter rivets, bolts, and panel bond.

For the flat floor, I would need to make 50 rivet holes, and for the brace and lions another 20-30 bolts. I definitely reconsidered this a few times, but it did provide some advantages later. Everything needed to be captive nuts or bolts, both for stiffness and ease of installation. Flanged nuts are great for this, make a larger hole, press them in, and weld around the edges. It will take a while to fabricate all these.

A couple other finds in this area. The SE uses this extremely over built bracket for the carbon canister which needs to be removed. Also, this odd sharpened tube which points forward to where the spare tire well once was - nothing attached to it. I have a theory about it's purpose, any ideas?
 

Attachments