
We all know the stock sub is next to useless. At this stage I just wanted some more kick in the sound without starting a significant rip & replace of speakers/components, so I bought this: https://www1.crutchfield.com/p_575P...d.com/p_575PS8/Rockford-Fosgate-PS-8.html?search=rockford_fosgate_ps-8&skipvs=T
My reasons for choosing the PS-8 were:
1. Height. it's low enough to fit more or less flush in the existing cubby area (with some minor cutting).
2. Flexibility & convenience. High level inputs, varied on/off control, remote level control.
3. Reviews. Well reviewed for what it is.
4. Price - got mine from eBay for a great deal.
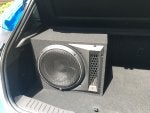
This is the end result.
You can see it's flush enough so the trunk floor/cover sits easily over the unit. It has only the slightest height protrusion towards the centre of the unit - this doesn't interfere in any significant way with the trunk floor sitting in place (at least not where I located the unit).
![]()
I usually take more pics of a mini project like this, but I hadn't planned initially on posting this because it was so basic. Then I thought it might be useful to some - so this is all I have. :-/
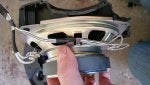
Re-Use the Old Sub's Connector
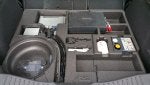
I first took out the doughnut stock sub and proceeded to dissect it so I could behold the wonder of its engineering (actually I just wanted to get the connector off it).
Once you get it open you can easily clip the wires and extract the connector for you to re-purpose to plug into the existing harness. I soldered & shrink-wrapped some male RCA connectors to this connector to plug into the female RCA connectors on the sub. Instructions say to cut the RCAs off if wiring to high-level source, but I didn't want to cut them off [yet], so I used RCAs on both sides.
I'm sure there are pics of it already out there, but for anyone curious...
![]()
![]()
![]()
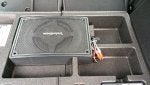
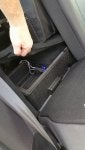
Choose a Location
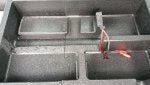
I measured the width/depth of the unit and chose a location for it. Then I did some minor cutting to make a spot for it that will keep it snug. Note I reused some of the cutout pieces to level the area where I put it.
![]()
![]()
![]()
Note in the above pic that I removed the bracket and protruding bolts from the old sub location. I put some clear sealant (dries clear) in the holes to protect the open holes.
The location is convenient.
- I can simple move the right side rear seat forward and access the controls from there if necessary.
- The weight of the unit is in front of the rear wheels and opposite the driver (little thing, but it all adds up imo).
![]()
Power
- I removed the T40 bolt that is directly underneath the foam cubby area where I placed the speaker (about 4" in from the wheelwell) and put a grounding lug in place there and returned the bolt into place. It's a nice bare grounding area under the painted bolt - good grounding point.
- Re +12, I used a fuse tap to tap into one of the available/unused SWITCHED power terminal/plugs in the trunk's fusebox. Some thoughts here... I don't play audio super loud, and I don't listen to [a lot of] pounding audio, so I felt ok feeding the power to the sub with just a standard 16g wire 10A fused tap. Plus the in-line fuse the unit comes with in the supplied power wire is 10A, so in theory 16g wire feeding 10A should be perfectly fine. However, if I felt I needed more current, there are of course high-current terminals in the same fusebox. If I were to use one of those I would use the lower current switched 12v to power a relay between a high-current (ALWAYS ON) 12v terminal and some significantly heavier gauge wire to the sub.
Results
- For a self-contained 8" sub, it puts out some good power.
- I still have to run the remote volume control, but I have it set to about 2/5 power level now and that seems about right for my listening.
- Miles beyond the stock sub in effectiveness.
- Seamlessly sits in place.
- Overall a satisfying cheap and simple upgrade for the system that moves it from total crap sound to middling level sound - enough to tide me over until a full upgrade sometime in the future.
Notes
- Although the use of RCAs may imply a low-level signal input to the sub, as noted I am actually using the high-level input directly from the stock sub harness and. I used the RCA M/F connectors just for convenience (the sub already comes with the RCA Females attached and I didn't really want to cut them off if I didn't have to).
Update: For some info re settings, jump to http://www.focusrs.org/forum/15-foc...-cheapie-sub-upgrade-using-rockford-fosgate-ps-8-a-post1929609.html#post1929609
My reasons for choosing the PS-8 were:
1. Height. it's low enough to fit more or less flush in the existing cubby area (with some minor cutting).
2. Flexibility & convenience. High level inputs, varied on/off control, remote level control.
3. Reviews. Well reviewed for what it is.
4. Price - got mine from eBay for a great deal.
This is the end result.
You can see it's flush enough so the trunk floor/cover sits easily over the unit. It has only the slightest height protrusion towards the centre of the unit - this doesn't interfere in any significant way with the trunk floor sitting in place (at least not where I located the unit).
I usually take more pics of a mini project like this, but I hadn't planned initially on posting this because it was so basic. Then I thought it might be useful to some - so this is all I have. :-/
Re-Use the Old Sub's Connector
I first took out the doughnut stock sub and proceeded to dissect it so I could behold the wonder of its engineering (actually I just wanted to get the connector off it).
Once you get it open you can easily clip the wires and extract the connector for you to re-purpose to plug into the existing harness. I soldered & shrink-wrapped some male RCA connectors to this connector to plug into the female RCA connectors on the sub. Instructions say to cut the RCAs off if wiring to high-level source, but I didn't want to cut them off [yet], so I used RCAs on both sides.
I'm sure there are pics of it already out there, but for anyone curious...


Choose a Location
I measured the width/depth of the unit and chose a location for it. Then I did some minor cutting to make a spot for it that will keep it snug. Note I reused some of the cutout pieces to level the area where I put it.
Note in the above pic that I removed the bracket and protruding bolts from the old sub location. I put some clear sealant (dries clear) in the holes to protect the open holes.
The location is convenient.
- I can simple move the right side rear seat forward and access the controls from there if necessary.
- The weight of the unit is in front of the rear wheels and opposite the driver (little thing, but it all adds up imo).
Power
- I removed the T40 bolt that is directly underneath the foam cubby area where I placed the speaker (about 4" in from the wheelwell) and put a grounding lug in place there and returned the bolt into place. It's a nice bare grounding area under the painted bolt - good grounding point.
- Re +12, I used a fuse tap to tap into one of the available/unused SWITCHED power terminal/plugs in the trunk's fusebox. Some thoughts here... I don't play audio super loud, and I don't listen to [a lot of] pounding audio, so I felt ok feeding the power to the sub with just a standard 16g wire 10A fused tap. Plus the in-line fuse the unit comes with in the supplied power wire is 10A, so in theory 16g wire feeding 10A should be perfectly fine. However, if I felt I needed more current, there are of course high-current terminals in the same fusebox. If I were to use one of those I would use the lower current switched 12v to power a relay between a high-current (ALWAYS ON) 12v terminal and some significantly heavier gauge wire to the sub.
Results
- For a self-contained 8" sub, it puts out some good power.
- I still have to run the remote volume control, but I have it set to about 2/5 power level now and that seems about right for my listening.
- Miles beyond the stock sub in effectiveness.
- Seamlessly sits in place.
- Overall a satisfying cheap and simple upgrade for the system that moves it from total crap sound to middling level sound - enough to tide me over until a full upgrade sometime in the future.
Notes
- Although the use of RCAs may imply a low-level signal input to the sub, as noted I am actually using the high-level input directly from the stock sub harness and. I used the RCA M/F connectors just for convenience (the sub already comes with the RCA Females attached and I didn't really want to cut them off if I didn't have to).
Update: For some info re settings, jump to http://www.focusrs.org/forum/15-foc...-cheapie-sub-upgrade-using-rockford-fosgate-ps-8-a-post1929609.html#post1929609